 |
| Walnut logs from trees taken down in my back yard |
 |
| Rough cut slabs air drying with a dehumidifier |
 |
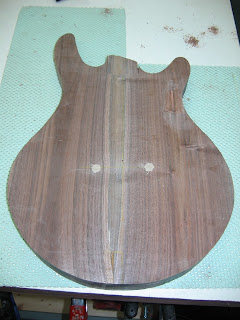
| After 1+ year of air drying, walnut slabs are planed and glued into a body blank |
 |
| Glued up body blank. Oversized so final shape can be cut out avoiding the snipe from the planer at each end |
 |
| All the parts. Used 5 different sources for parts. |
 |
| Trying shapes. This is a tracing of my 1981 Matsumoku Skylark |
 |
| Almost there |
 |
| Final shape: Synthesis of the Skylark and a PRS SE Custom 22 |
 |
| Neck pocket routed. Flat bottom, but I install a 1degree walnut shim for a slight angle |
 |
| Eye, ears, and breathing protection a must! |
 |
| Rough cutting the body shape |
 |
| Finishing the rough cut of the body |
 |
| Starting to look like a guitar! Just a bit of sanding to get a perfect neck fit |
 |
| Using the router with a pattern cutting bit to start the final shaping. I then used a long flush cut bit with bearing to cut the pattern for the full body thickness (1 11/16") |
 |
| Neck pocket ready for drilling. I used threaded inserts in the neck for a true "bolt-on," rather than screw-on construction |
 |
| The best laid plans... Apparently my measurements were off slightly, so I had to fill and then re-drill the bridge stud holes. Luckily, this was hidden by the recessed routing for the bridge |
 |
| Starting the edge profile by rounding over with the router. The heel and tummy contour on the back I shaped by hand with a rasp and then sanding |
 |
| Correct stud holes drilled! |
 |
| Using a forstner bit in the drill press to cut out the bulk of the pickup routs. STEWMAC template and double-sided tape worked great |
 |
| Two pikup rots done, bridge recess rout done |
 |
| All top routs, drilling completed |
 |
| Control cavity, vol/tone pots, 3-way switch and panel jack holes completed |
 |
| Matching walnut control cavity cover |
 |
| Recessed, shaved body stub for attaching neck. Countersunk holes for neck bolts with ferrules. I wouldn't try this with any wood, but walnut is very strong |
 |
| Brass threaded inserts installed |
 |
| Bolting neck to body |
 |
| Grain filler on back |
 |
| Grain filler on front |
 |
| Grain filler on cover. I go through a ton of Daisy sour cream containers: mixing grain filler, dyes, etc. |
 |
| soldering a ground wire to the bottom of a bridge stud before installing stud. This is a step often overlooked by 1st time DIY'ers |
 |
| Close up of pressing in the bridge studs |
 |
| Everything laid out for final assembly. A piece of 2x4 wrapped in foam shelf liner makes a handy neck support |
 |
| Panel jack installed |
 |
| Copper shielding tape installed.I use an extra piece of copper tape folded up with holes punched in it for a grounding "bus." |
 |
| Installing STEWMAC Golden Age pickups, top string ferrules and Gotoh bridge |
 |
| Green wire is ground wire from bridge stud. Wires are looped to avoid being caught by pickup adjustment screws |
 |
| Rear string ferrules and control cover installed |
 |
| Shallow tummy contour visible |
 |
| Ready for final bridge installation and stringing up |
 |
| Humbucker rings I crafted from Poplar. The final version was maple I believe |
 |
| Finished! |
 |
| Earvana nut installed, barrel style string tree installed. Gotoh (SG38?) tuners from Warmoth installed. Headstock re-shaped from original strat style |
 |
| Control layout: master vol, 2 tone, 3 way switch, push/pull pot for coil tap |
 |
| Detail showing staggered string-through, recessed bridge, wood pickup rings |
 |
| Love the grain! |
 |
| Walnut "skunk stripe" in neck matches walnut body |
 |
| Finished, set up, played in and ready to ship to my son in San Diego. Check out the Gore Horsemen to see/hear this baby in action! |


No comments:
Post a Comment